Extending Libjitsi to support capturing specific windows in Ubuntu -1
Short introduction about Jitsi
Jitsi is an open source VoIP, video conferencing and instant messaging application which has a multi-platform support for Windows , Linux and Mac OS X.
You can download it from the following URL. There are separate setup files for each operating systems including Windows, Ubuntu and MacOS.
Brief introduction about the improvement
Currently jitsi supports sharing the entire desktop or part of the desktop(specifying a rectangular region). This is particularly done using libjitsi, consists of a set of Operating System specific native libraries which can perform various tasks such as Capturing and rendering video. But there are situations that the user need to share a specific window only. The window may or may not be appearing in the desktop. Here I am trying to improving the library to support that functionality Ubuntu.
Libjitsi is basically an advanced Java media library for secure real-time audio/video communication. Additionally it supports taking screen captures as well. It was previously inside Jitsi main source code but late it has been separated so that other projects can use the library easily.
Source for Jitsi can be found in:
Existing implementation details about capturing entire desktop
As I mentioned earlier, currently Libjitsi support capturing the entire desktop.
There are mainly two types of implementation of current screen capturing.
- Java AWT Robot
- Using JNI(Java Native Interface)
Using Robot to take screenshots is very easy. Following example java function briefs about it.
|
public void captureScreen(String fileName) throws Exception {
   Dimension screenSize = Toolkit.getDefaultToolkit().getScreenSize();
   Rectangle screenRectangle = new Rectangle(screenSize);
   Robot robot = new Robot();
   BufferedImage image = robot.createScreenCapture(screenRectangle);
   ImageIO.write(image, "png", new File(fileName));
}
|
But it has following problems regarding this task of taking screenshots of specific windows.
- This runs on top of JVM. So this is much slower in running and takes much memory if you take large screenshots in size.
- This can only take screenshots which are already displayed in the desktop. That is it cannot take screenshots of windows which are minimized.
When a window is drawn its details are managed by the Operating System already. If we can access it from java we can take the snap we need efficiently. But the problem is those libraries are Operating System specific and mostly written in C. So we should have a way to access them using Java. That is when JNI(Java Native Interface) comes into play. This is the second and the most important method mentioned above.
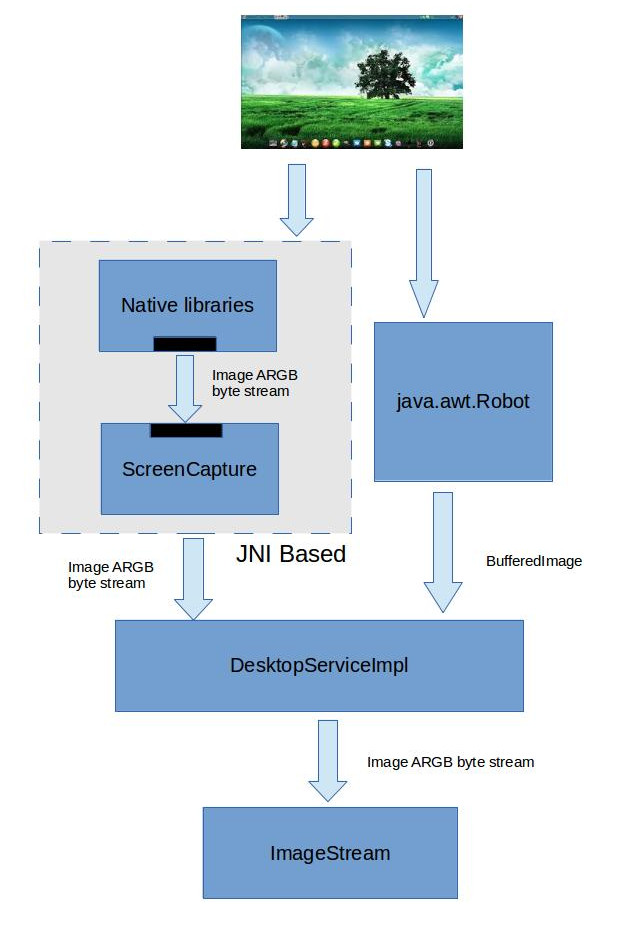
Following is the basic data flow diagram for the existing implementation.
It illustrates the above two approaches mentioned earlier.
Basically JNI provides a interface to java to call methods which are implemented in other languages such as C. Here please note the above
ScreenCapture in the diagram
. It is the java class which act as the Native Interface for accessing OS specific library written in C. You can find this class implementation
here.
See the following method in the class:
 public static native boolean grabScreen(

            int display,

            int x, int y, int width, int height,

            byte output[]);
If we take a screen shot of the entire desktop(or part of the desktop specified by a rectangle) using libjitst, this is the function we need to call. When we call this function it calls an OS specific native library which is preloaded like this at the top of the class.
 static

    {

        String lib = "jnscreencapture";

        try

        {

            System.loadLibrary(lib);

        }

        catch (Throwable t)

        {

            logger.error(

                    "Failed to load native library " + lib + ": "

                        + t.getMessage());

            throw new RuntimeException(t);

        }

    }
jnscreencapture is the library name mentioned here. In libjitsi this is written in C and compiled OS specifically. That means you need to keep separate files for each of the operating systems you hope to run this. You can see this library files
here.
You can see several folders for each operating systems. Go into linux-64 folder and you can see a file called
libjnscreencapture.so. If you call
grabScreen() in linux 64 bit version, this is the library file, it will access. See the following diagram.
Likewise there are separate library files for each of the operating systems in separate folders.
Lets have a look at how this file was generated.
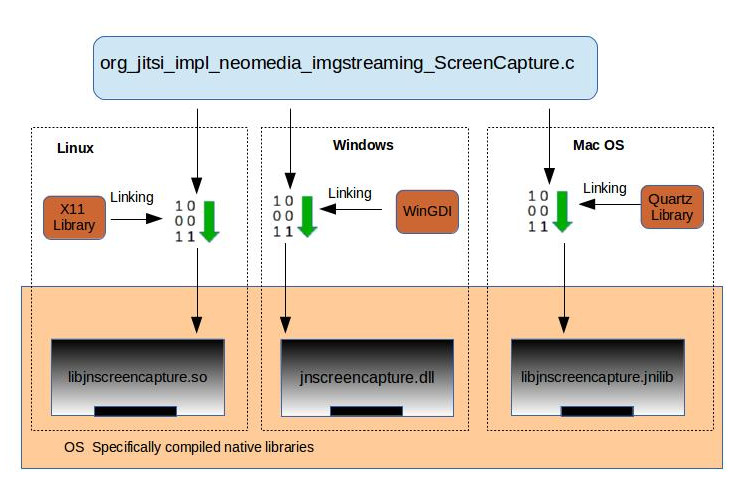
Actually this file was first written in C. You can see that file
here.
its name is org_jitsi_impl_neomedia_imgstreaming_ScreenCapture.c
Inside that see the following function.
static int x11_grab_screen(jbyte* data, unsigned int displayIndex, int x, int y, int w, int h);
This is the most important function which implements the current screen capturing in Linux operating system. You can see the following functions as well which implement it for Windows and MacOS operating systems.
static int quartz_grab_screen() - MacOS implementation of screen capture
static int windows_grab_screen() - Windows implementation of screen capture
Now I think you can get a basic understand about how the data flow happens. When we called grabScreen() method in the
ScreenCapture.java class it will go though several paths and finally calls the above methods according to the operating system you are running, takes the screenshot and get image data back to the place where you called the java grabScreen() method.
Improving the the library to get screenshots of specific windows
So what we basically have to do is improving the above .c file.
org_jitsi_impl_neomedia_imgstreaming_ScreenCapture.c
We can introduce several new methods to get following things done.
- Get a list of names and IDs of windows which are currently opened.
- Introduce a new method to get a screenshot of a specific window specified by its ID. For ubuntu it will look like:
- static int x11_grab_window(jbyte* data, unsigned int displayIndex,unsigned int windowID , int x, int y, int w, int h);
And accordingly you will have to improve ScreenCapture.java JNI wrapper(just add the method -- its easy :) ) to support the newly added function.